6-cylinder Single Vanos Diaphragm
Spring Procedure
Home
BMW e46 vanos repair kit
The following information is
provided for reference purposes only and should be used at your own risk
In no event shall Vanos-BMW.com or its members be liable for incidental,
consequential, or special loss or damages of any kind however caused.
Introduction
BMW introduced its first variable valve timing systems in
93. It called its variable valve timing unit “vanos”. On the standard i6 engine
this was a single vanos (intake adjustment) and was initially introduced on car
models E36 320i/325i and E34 520i/525i. BMW soon realized its variable valve
timing system was prone to a rattle. It modified the system to incorporate a
diaphragm spring on the intake camshaft sprocket. The diaphragm spring dampens
sprocket rotational play and thus reduces the rattle. This diaphragm spring
design was incorporated in all subsequent standard i6 single vanos car models,
except the Euro 328i. On March 95 build the diaphragm spring design was
introduced on the E36 320i/325i/Euro 328i and E34 520i/525i.
This diaphragm spring design can be retrofitted onto pre March 95 build E36 320i/325i/Euro
328i and E34 520i/525i cars. This retrofit can significantly reduce the variable
valve timing system rattle.
Technical background
To understand the function of the diaphragm spring for
reducing the rattle some understanding of the BMW variable valve timing system
is needed.
Variable valve timing is the modifying of the engine valve opening/closing
timing dynamically. BMW’s variable valve timing implements a time shift (phase
shift) scheme. The camshaft cam is not modified, thus all the characteristics
of the opening and closing of the valve remain the same. What changes is the
time when the valve opening/closing occurs relative to the crankshaft timing.
The camshaft relative rotational position to the crankshaft is modified
(shifted). Advancing (clockwise) the camshaft advances (earlier) the valve
timing (opening/closing) relative to the crankshaft. Retarding (counter
clockwise) the camshaft retards (later) the valve timing (opening/closing)
relative to the crankshaft.
Helical (slanted) gears are utilized to physically implement this mechanism.
Due to their nature, helical gears require a rotation to insert onto each
other. This characteristic of helical gears is utilized to implement the
relative rotation of the camshaft to the crankshaft dynamically while the
engine is running.
[picture]
The camshaft and camshaft sprocket are not mounted directly to each other. The
sprocket has a hole at its middle that’s larger than the camshaft end. Opposing
slant helical gears are mounted at the sprocket hole and camshaft end. There is
an independent splined shaft with a cup and helical gears on the inside and
outside of the cup walls. The splined shaft cup inner helical gears match the
camshaft helical gears and the splined shaft cup outer helical gears match the
sprocket helical gears. The splined shaft cup is inserted onto and mates with
the camshaft and sprocket helical gears. Thus the splined shaft connects the
camshaft and sprocket. Inserting and withdrawing the splined shaft axially
in/out of the camshaft and sprocket requires the rotation of a component due to
the helical gears. The sprocket rotation is fixed by the timing chain. The
splined shaft can’t rotate due to the opposing helical gear slants on its cup
inside and outside. Thus it’s the camshaft that rotates when the splined shaft
is manipulated axially.
[picture]
Inserting the splined shaft axially onto the camshaft and sprocket causes the
camshaft to advance (rotate clockwise) and cause advanced (earlier) timing.
[picture]
Withdrawing the splined shaft axially from the camshaft and sprocket causes the
camshaft to retard (rotate counter clockwise) and cause retarded (later)
timing.
The vanos is a hydraulic actuator. Its function is to
dynamically position the splined shaft axially to cause camshaft advance or
retard rotation which enacts variable valve timing.
The vanos utilizes two cylinders and a piston. There is an oil chamber at the
fore and aft of the piston. Controlling the oil pressure in the two oil
chambers manipulates the axial position of the piston. Seals on the piston
allow the piston to reciprocate axially along the cylinder walls while
maintaining a tight oil seal on the two oil chamber. The splined shaft is
mounted to the vanos piston. Thus manipulating the axial position of the piston
also manipulates the axial position of the splined shaft. The piston has a
bearing at its center. The splined shaft is mounted to this bearing. The piston
bearing allows the splined shaft to rotate with the camshaft and sprocket while
not rotating the piston.
On a non variable valve timing engine the camshaft sprocket is mounted directly
to the camshaft. As noted above with the BMW variable valve timing system the
sprocket is connected to the camshaft via the splined shaft. But this is not
sufficient to fully support the sprocket. BMW devised a method to mount the
sprocket on the camshaft but still allow the camshaft to rotate independent of
the sprocket for variable valve timing adjustment.
The camshaft has three dowels protruding axially and the sprocket has three
slots along its face. The sprocket slots are inserted onto the camshaft dowels.
When the camshaft is rotated for timing adjustment the camshaft dowels slide
along the sprocket slots. This allows the camshaft to rotate independent of the
sprocket.
To maintain the sprocket on the camshaft dowels, stop disks are mounted at the
fore and aft of the sprocket. These stop disks are fully mounted on the
camshaft dowels and rotate with the camshaft. During camshaft timing adjustment
the stop disk faces slide along the sprocket faces.
Cause of rattle
Due to the nature of helical gears, not only does the axial
positioning of the splined shaft cause the rotation of the camshaft, but also
reciprocally the rotation of the camshaft causes the axial positioning of the
splined shaft.
Over time and use the helical gears on the camshaft, sprocket, and splined
shaft develop wear along the gear spline side contact surfaces. This wear
creates excessive play between the helical gears. This causes excessive play in
the fit of the splined shaft to the camshaft and sprocket. This manifests in
axial play between the splined shaft and camshaft and sprocket.
As the camshaft rotates the cam nose rolls onto the valve seat and compresses
the valve spring to open the valve and rolls off the valve seat and
decompresses the valve spring to close the valve. The resistance force of the
valve spring compression creates an opposing force to the forward rotation of
the camshaft. The recoiling force of the valve spring decompression creates an
additive force to the forward rotation of the camshaft.
Due to the splined shaft axial play, as the cam compresses the valve spring the
camshaft will slightly retard in relative rotation to the crankshaft and as the
cam decompresses the valve spring the camshaft will slightly advance in
relative rotation to the crankshaft. These movements of the camshaft are due to
camshaft least resistance path of movement. Due to the splined shaft axial play
there is less resistance to the camshaft retarding than compressing the spring
and less resistance to the camshaft advancing than containing the decompressing
spring. These movements manifest into camshaft lashes which engage the splined
shaft axially. The greater the helical gear wear the greater the splined shaft
axial play the stronger the camshaft lashes.
At certain engine RPMs these camshaft movements resonate. This causes stronger
camshaft lashes which cause more powerful engagements of the splined shaft
axially. This causes strong axial movements of the splined shaft. Any axial
play in the splined shaft vicinity is engaged and can cause a rattle.
There are two locations of axial play. The helical gears themselves have axial
play that’s engaged and rattles and the vanos piston bearing has axial play
that’s engaged and rattles.
The splined shaft axial movements caused by the camshaft lashes are facilitated
by the helical gear wear, but they are also enhanced by sprocket rotational
play.
The sprocket is mounted rotationally by the splined shaft and timing chain. The
splined shaft and sprocket helical gears wear and create play as noted above. Also
the timing chain has excess length. The helical gear play and timing chain
excess length combine to create sprocket rotational play.
When the camshaft lash moves the splined shaft axially the splined shaft also
engages the sprocket. Due to the sprocket rotational play the splined shaft
axial movement causes to rotate the sprocket. This allows the splined shaft to
have longer axial movements. These longer movements enhance the effect of the
camshaft lashes on the splined shaft. The splined shaft axial movements become
stronger and more able to engage associate components play and cause it to
rattle.
Diaphragm spring rattle solution
In an attempt to reduce the rattle BMW introduced a
diaphragm spring that improves the sprocket mount and dampens its rotational
play.
The diaphragm spring is included as part of the camshaft sprocket apparatus. In
addition to the sprocket outer stop disk, a diaphragm spring (concave plate) followed
by an additional stop disk are installed. When the last outer stop disk is
mounted on the camshaft dowels the diaphragm spring is compressed. This causes
to press the stop disks on the fore and aft of the sprocket onto the sprocket
faces. This creates resistance to sprocket rotation and dampens sprocket
rotational play movements. This acts to inhibit splined shaft axial movements
and in turn reduces the rattle.
The diaphragm spring force is not excessive and thus still allows the sliding
of the stop disk faces along the sprocket faces during camshaft timing
adjustment.
Diaphragm spring retrofit
Pre March 95 build E36 320i/325i/Euro 328i and E34 520i/525i
cars can retrofit install the diaphragm spring. To do this the existing
camshaft dowels are replaced with longer dowels and the sprocket outer stop
disk is replaced with a stop disk, diaphragm spring, and stop disk.
The needed parts are available from BMW and are listed in this repair
procedure.
Symptoms
Vanos rattle at a certain RPM range, often 1800-2200 RPM.
Rattle can also occur at idle.
Repair Procedure
The following is a single vanos intake sprocket diaphragm
spring retrofit repair procedure.
The procedure applies to pre March 95 build E36 320i/325i/Euro 328i and E34
520i/525i cars.
This repair should be performed with the single vanos seals repair and single
vanos rattle repair.
Single
Vanos Seals Procedure, Single
Vanos Rattle Procedure
Repair time: .5 hours mechanic, 1+ hours DIY.
Parts, Tools, and Shop
Supplies
Parts with part number pattern xx-xx-x-xxx-xxx are BMW parts
and can be acquired from a BMW dealership.
Vanos-BMW.com does not provide any of the following parts.
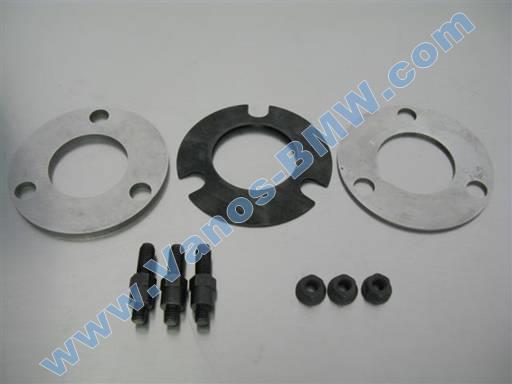
First intake sprocket outer stop disk (thin) (11-36-1-403-822) $49.67/each, intake
sprocket diaphragm spring (11-36-1-403-550) 7.67/each, second intake sprocket
outer stop disk (thick) (11-36-1-403-823) $19.45/each, 3 x intake sprocket
studs (11-36-1-403-824) $6.39/each, 3 x intake sprocket nuts (07-11-9-900-910)
$.25/each
Note: Do not utilize nut referenced in BMW Service Information. Nut referenced
supersedes to nut that does not work. Nut over tightens sprocket diaphragm
spring and prevents ability to perform timing rotation adjustment. Nut listed above
is from BMW ETK and works properly.
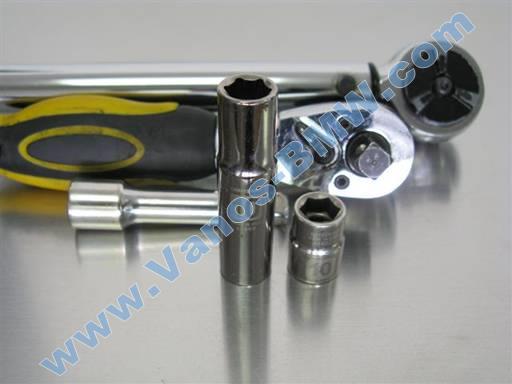
10mm socket 3/8”, 10mm deep socket 3/8”
3/8” ratchet, 3/8” socket extension (short)
3/8” torque wrench (10 Nm [7 ft-lb], 22 Nm [16 ft-lb])
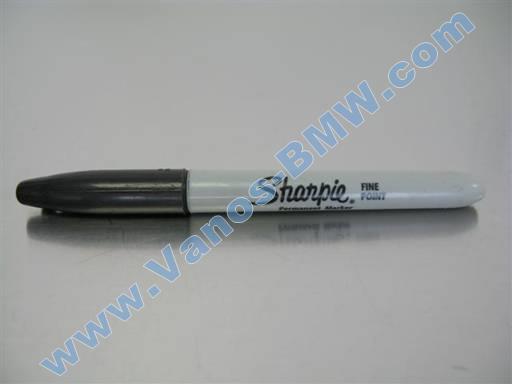
Magic marker
Not shown: small cloth towel
Repair
Repair is performed once vanos is removed from engine. Refer
to single vanos repair procedure, Single
Vanos Procedure
Intake camshaft must be locked per method specified in single vanos repair
procedure.
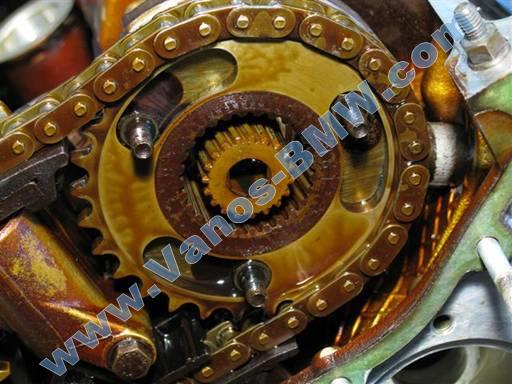
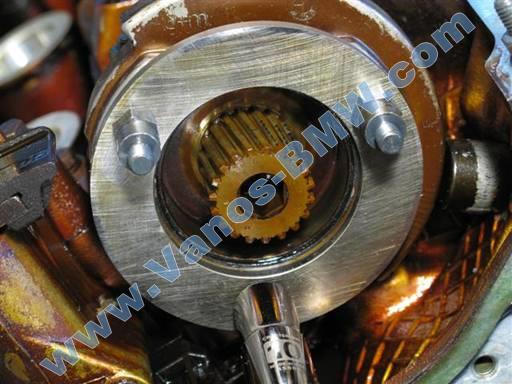
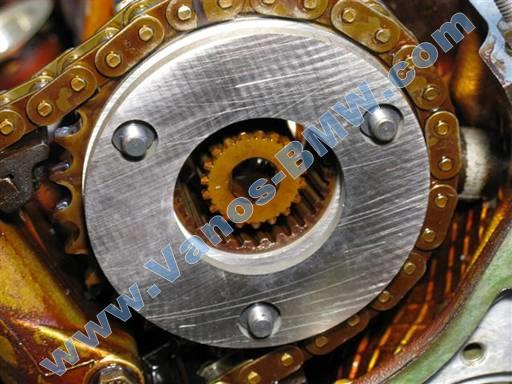
Removal of sprocket
components
Insert cloth towel below intake sprocket. This will prevent any falling bolt/nut from dropping into oil sump.
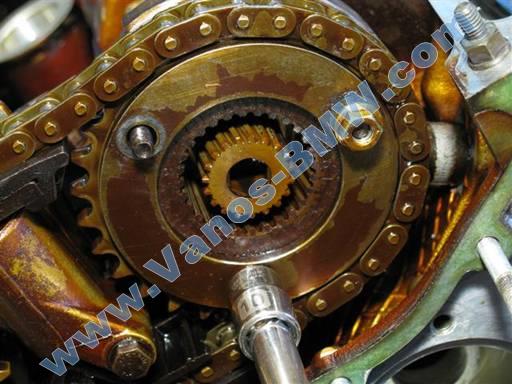
Remove intake sprocket 3 mounting nuts (10mm socket 3/8” / 3/8” ratchet &
extension).
Remove intake sprocket outer stop disk.
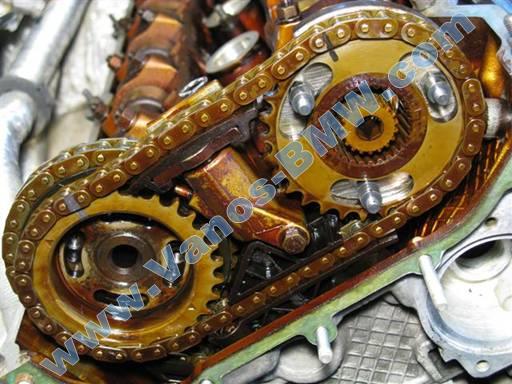
Mark intake sprocket and chain matting at top (marker).
Mark exhaust sprocket and chain matting at top (marker).
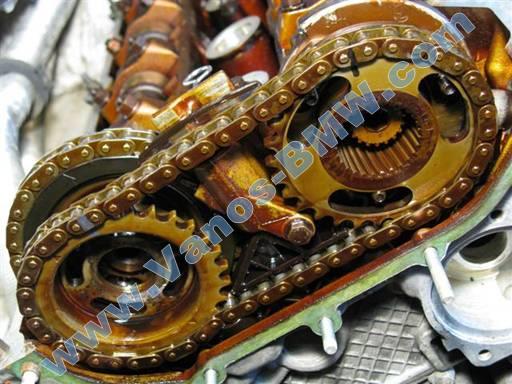
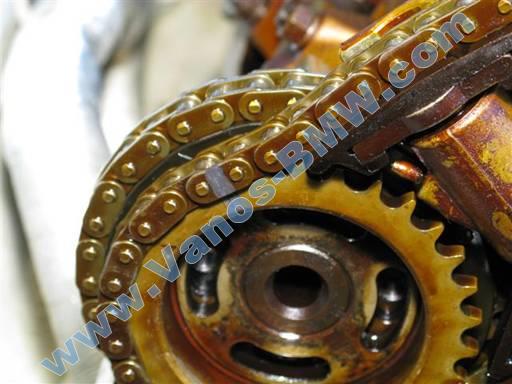
Remove intake and exhaust sprockets and chain as one part.
Do not disconnect chain from sprockets. Keep sprockets separated to maintain
chain mount.
Note: Outer disk at exhaust sprocket is missing in picture.
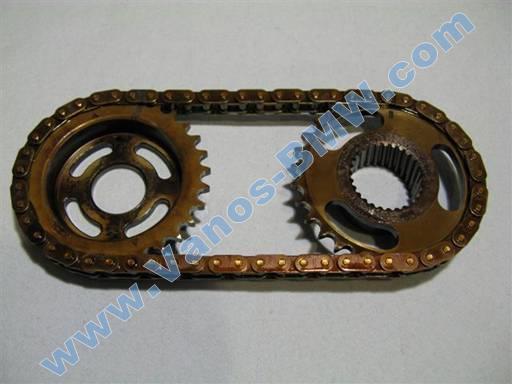
Lay down sprockets and chain on table. Keep sprockets separated to maintain
chain mount.
Intake and exhaust after sprockets removal.
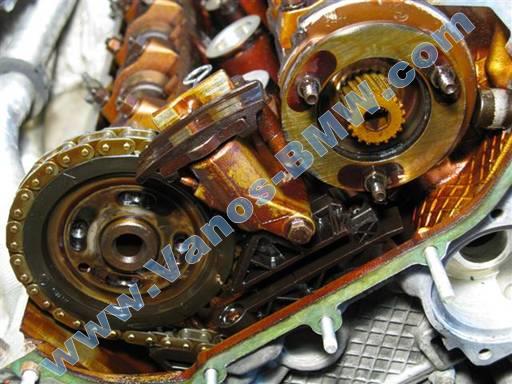
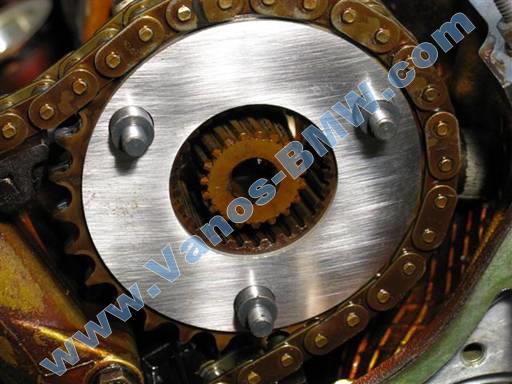
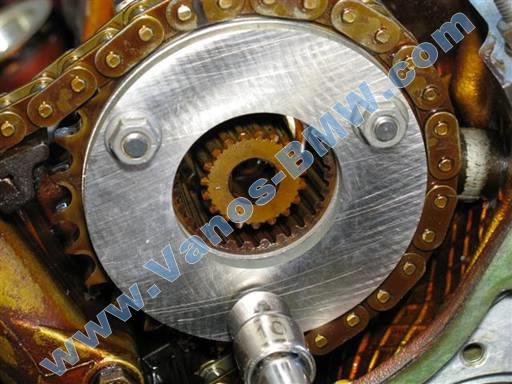
Remove intake sprocket 3 mounting studs (10mm deep socket 3/8” / 3/8” ratchet).
Note: Maintain intake inner stop disk and notched wheel on camshaft.
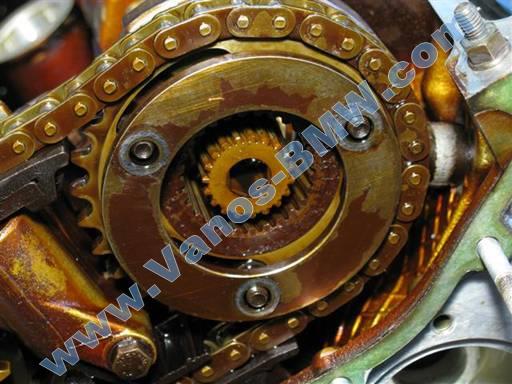
Installation of sprocket components
Install intake sprocket 3 new mounting studs (10mm deep socket 3/8” / 3/8”
ratchet).
Fully tighten 22 Nm (16 ft-lb) (10mm deep socket 3/8” / 3/8” torque wrench).
Note: Tighten studs evenly in multiple passes.
Note: Verify one pass with all studs fully tightened.
Note: Old inner stop disk was removed and cleaned. This is not necessary.
Install intake and exhaust sprockets and chain onto camshafts.
Keep sprockets separated to maintain chain mount.
Note: Rotational position of sprockets is not important. This will be set when
vanos is installed.
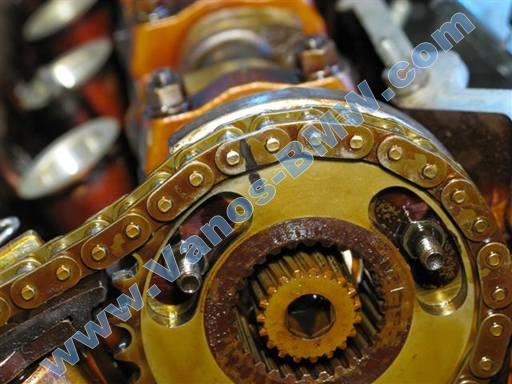
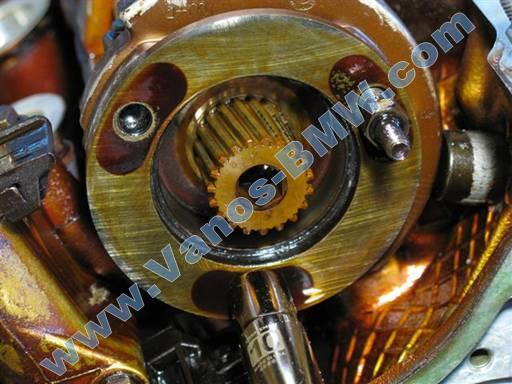
Install intake sprocket new first outer stop disk onto intake studs (thin
plate, 2mm).
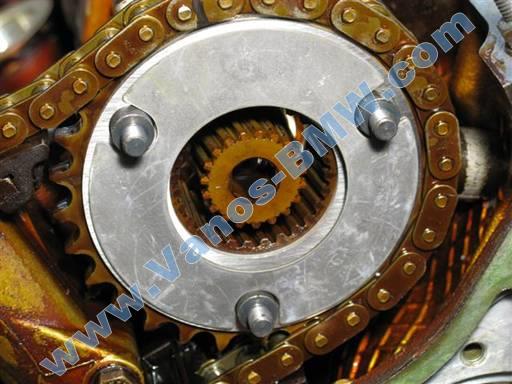
Install intake sprocket new diaphragm spring onto intake studs.
Install intake sprocket new second outer stop disk onto intake studs (thick
plate, 4mm).
Install intake sprocket new 3 mounting nuts (10mm socket 3/8” / 3/8” ratchet
& extension).
Fully tighten 10 Nm (7 ft-lb) (10mm socket 3/8” / 3/8” torque wrench &
extension).
Note: Tighten nuts evenly in multiple passes.
Note: Verify one pass with all nuts fully tightened.
Remove cloth towel from below intake sprocket.
2010 Vanos-BMW.com
sales@vanos-bmw.com